
BLOG
How to do a plumb line posture check on a side photo
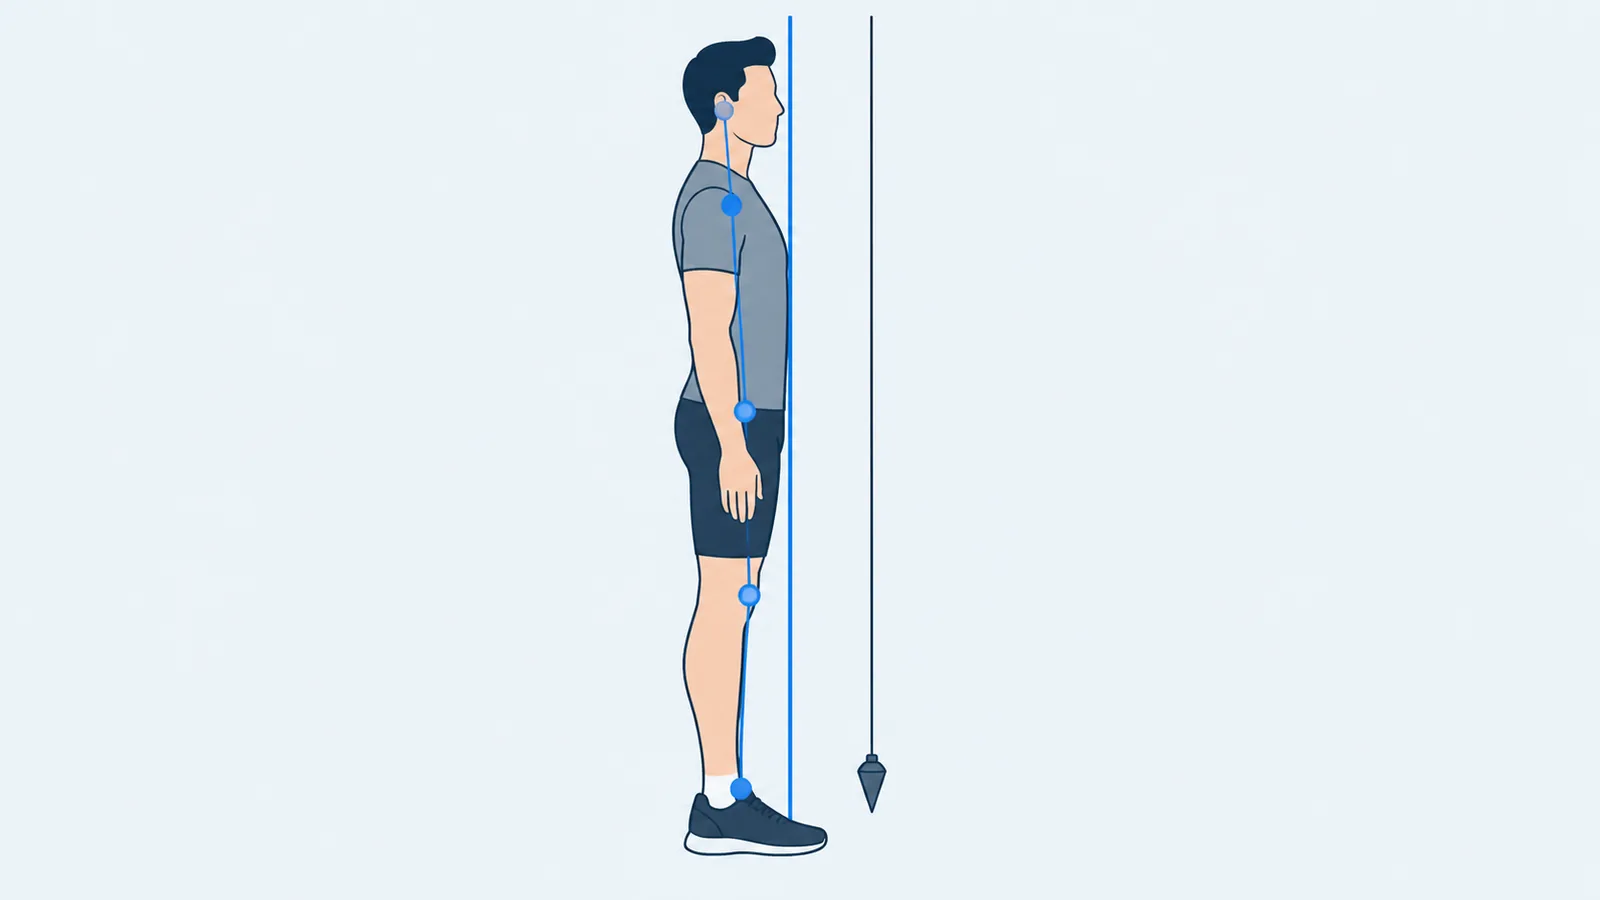
A plumb line posture check compares your side profile with a true vertical line. In the reference alignment in a 2023 American College of Sports Medicine (ACSM) article, the line passes just in front of the outer ankle bone, slightly in front of the knee, through or just behind the hip, through the middle of the shoulder and through the ear. That is a visual reference, not a measured normal. The hard part is getting the line truly vertical.
You need a side photo, a piece of string with a small weight, and about 15 minutes. If you are new to self-checks, how to check your posture at home with your phone compares the wall test, photos and apps first.
What the plumb line is in posture assessment
A plumb line is a string with a weight at the end. Gravity pulls it into a true vertical, so it gives the eye a fixed reference to compare body landmarks against. Clinicians have used it for a long time: a 2024 study by Roggio and colleagues dates it to 1855 and describes two uses. In the side view, it helps the examiner judge front-to-back balance and measure the distance from the line to points on the spine, such as the bony bump at the base of the neck (C7). From behind, the line runs over the spine to show sideways deviations.
Two other things are easy to confuse with it:
- The line of gravity is the vertical line through the body's centre of mass. A 2011 review by Le Huec and colleagues places it, seen from the side, very slightly behind the femoral heads (the ball of each hip joint). A string beside you shows a true vertical, not where your centre of mass is.
- A posture grid is a board of vertical and horizontal lines that people stand in front of. It does the same job as the string with more lines.
This article is about the first use: a true vertical next to a side view, which you can copy with a phone photo.
Where the line passes in the reference alignment
A two-part 2023 article for fitness professionals on the ACSM website (part 1, part 2) gives these landmarks for the side view. The line is anchored at the ankle and compared with the points above it.
| Landmark | Where the line passes in the reference | What to look for on a photo |
|---|---|---|
| Ankle | Just in front of the outer ankle bone (lateral malleolus) | The bump on the outside of the ankle; start the line a little in front of it |
| Knee | Slightly in front of the middle of the knee joint | The side of the knee, halfway between front and back |
| Hip | Slightly behind or in line with the hip joint | The bony point on the side of the upper thigh (greater trochanter) |
| Shoulder | Through the middle of the shoulder joint | The round point of the shoulder, seen from the side |
| Ear | In line with the ear canal opening (external auditory meatus) | The ear opening |
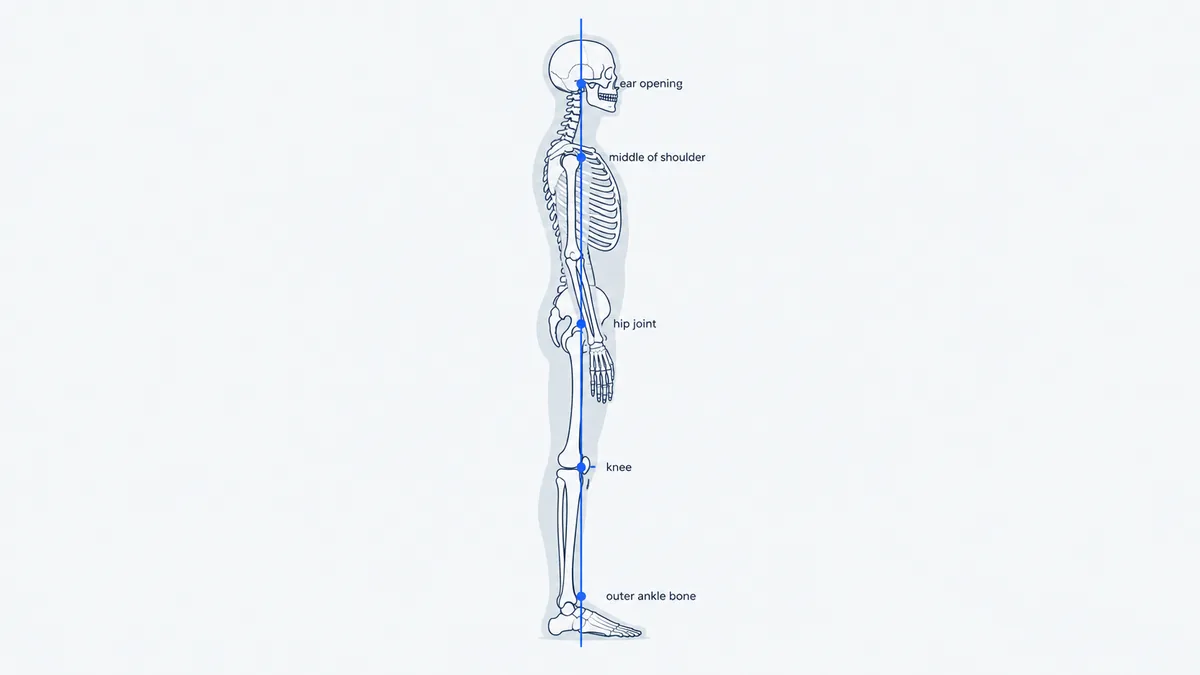
The article calls this an "ideal" static posture. It is a teaching reference, not a range measured in people without symptoms, and it gives no distance in centimetres beyond which a landmark counts as off the line. Read your photo as "in front of", "on" or "behind" for each landmark, and keep it at that.
How to draw a plumb line on a side photo
The line only means something if it is truly vertical. A line drawn straight up the edge of the photo is vertical only if the phone was perfectly level, so a real string in the frame is the safer reference.
- Hang a string with a weight. Tie a set of keys or a small bottle to a piece of string and hang it from a shelf, door frame or curtain rail, so it reaches the floor beside the spot where you will stand. Wait until it stops swinging. Research setups do the same: in the validation study of the SAPO posture software, a plumb line in the picture told the software which direction was vertical.
- Set up the phone. Prop it upright and level at waist to chest height, 2.5 to 3 metres away, using the main lens. Our guide to taking front and side posture photos explains each setting.
- Stand side-on next to the string. Stand a short step in front of it, in a true profile, barefoot, in fitted clothing, with long hair tied back so your ear shows.
- Settle into your usual stance. The ACSM article suggests standing as if you were waiting for an elevator, and some photo studies, such as Titcomb et al. (2024), have people march on the spot for a few steps first. Do not straighten up for the photo.
- Take the photo with the self-timer. Keep your whole body and the whole string in the frame.
- Open the photo in an editor that draws straight lines, or print it and use a ruler. Mark a point just in front of your outer ankle bone.
- Draw a line from that point parallel to the string, up past the top of your head.
- Note each landmark against the line. For the knee, hip, shoulder and ear, write "in front", "on" or "behind", with the date.
No string? Use a door frame or a corner of the room in the same photo. If its edge looks straight up and down and parallel to the side of the image, the phone was level enough to use the image edge as your vertical. If the door frame leans, the phone was tilted, and a line drawn parallel to the image edge will lean too.
What a plumb line check can and cannot tell you
A plumb line photo is a record of how you stood at one moment, front to back, against a true vertical. Taken the same way each time, it shows whether your head, shoulders or hips sit further forward or back than in an earlier photo. That is the whole of what it measures.
It cannot show the curves of your spine. In a study by Fedorak and colleagues (2003), 28 clinicians rated the neck and lower back curves of 36 people from photos as normal, increased or decreased; they agreed with each other only poorly (kappa 0.16) and with their own earlier ratings fairly (kappa 0.50). Judging curves from the outline is harder than it looks, even for professionals.
It is also only as good as the vertical. In a pilot study of 80 young adults and 55 adolescents, Roggio and colleagues found an average reliability (ICC, where 1 means perfect agreement) of 0.70 for spine distances measured from a hand-held plumb line, compared with above 0.90 when the line was fixed to a stand. In the SAPO study, the four measurements that did not reach acceptable agreement between raters were the ones that depended on marking the vertical line in the photo.
A difference from the reference line is not a diagnosis. An umbrella review of 41 systematic reviews (Swain and colleagues, 2020) found associations between spine postures and low back pain in some studies, but no consensus that posture causes it. If you have back pain, a photo will not explain it. The NHS advises seeing a GP if back pain does not improve after a few weeks of home treatment or is worse at night, and calling 999 or going to A&E if you have pain, tingling, weakness or numbness in both legs, loss of feeling around your genitals or anus, or changes in bladder or bowel control.
How PoseAlign's side-view numbers relate to a plumb line
PoseAlign, our free Android posture analysis app, reports two side-view angles rather than a plumb line. From one side photo it gives forward head angle and pelvic tilt, in degrees, calculated from the pose landmarks it detects. In the latest example report on the side-view analysis page, they are 12.3° and 1.6°.
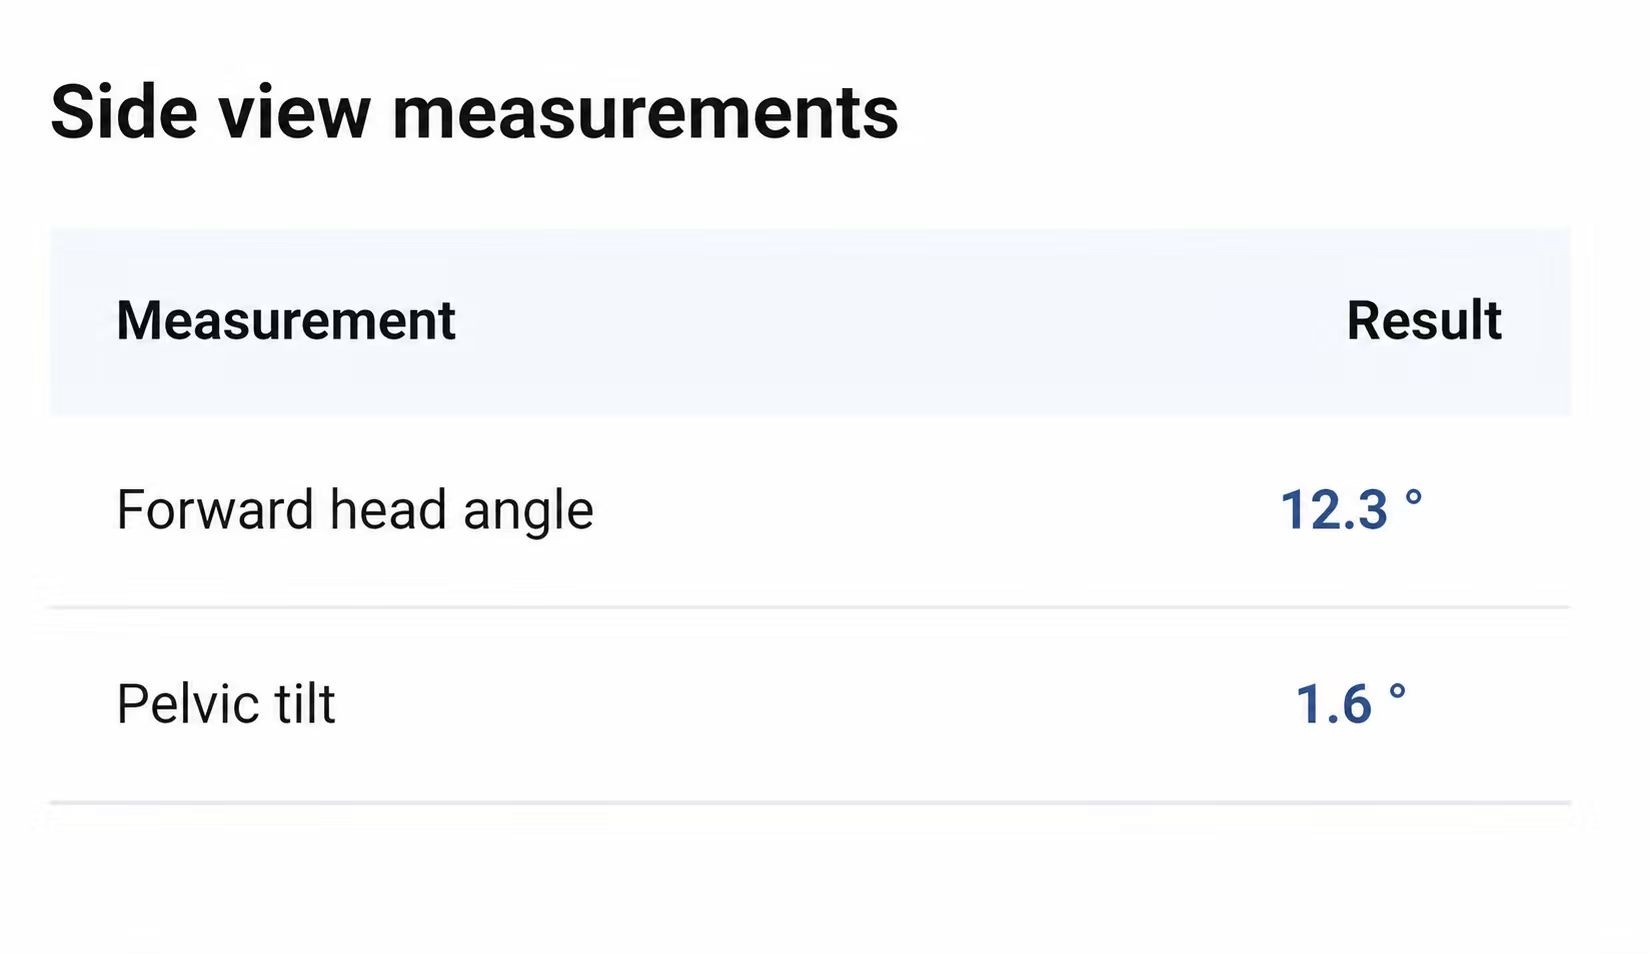
PoseAlign does not publish the formula behind either angle or the rule that highlights a value. In its example reports, the forward head angle of 24° in an earlier PDF (September 15, 2026) is highlighted in red, and the 12.3° in the latest screenshots is not. In our reading, this fits an angle where a larger number means the head sits further forward of the shoulders. That is our inference, not a published definition, and the value has not been established as the craniovertebral angle used in research. Forward head angle from a side photo explains how that research angle is measured.
The two methods look at the same photo in different ways. The plumb line gives you a picture of the whole chain from ankle to ear against gravity; PoseAlign gives two numbers for the head and pelvis on its own scale. You can use one side photo for both: check that PoseAlign's landmarks sit on your ear, shoulder and hip, then draw your plumb line on the same image.
Your first plumb line check
Hang the string, take one side photo with the setup above, and write down where your knee, hip, shoulder and ear sit against the line. Save the photo with the date and the camera distance and height. Repeat with the same setup in a month and compare the two photos side by side, rather than comparing either one with the reference line.